Introducing my New Roblox Game
I’ve put a lot of work into this, and I’m a long way from being finished. This is the first blog of many to come documenting my process and the methods I used to develop this new project – Disaster Slap Tower!
I proudly welcome you onboard this journey with me!
What’s it about?
This game is centred around completing an obstacle course with a catch – a big red button that could be pressed by any player, that triggers a completely random event, ranging from a fatal tsunami to an freezing chill that makes every platform slipperier than ice.
This game is heavily inspired from Slap Tower, a game with a similar gimmick, instead of the button, each player gets a slap hand that can sabotage other players.
I decided to magpie this idea, and added slap hands of my own, with the model taken from the toolbox, and the script tweaked to fit my liking.
Sketching Out Ideas
First things first – I made a small roadmap. This is where I planned a few simple things, consisting of:
- Obstacle tower – similar to Tower of Hell
- Simple button mechanism that calls a random event
- Developing a simple system that can handle event calling and execution of events
This helped me understand what exactly I need to do, and would help me stay on track.
Obby Design
I wanted the obby’s difficulty to slightly increase as you get nearer to the end, and so I gradually increased the damage that lava bricks do to players as you progress along the course
This implemented a smooth scale of difficulty that will allow both new and skilled players to enjoy.

The obstacle stages from Disaster Slap Tower
I colour coded each level with nice, easy pastel colours to attract players and ease up the vibe, my aim with this is to establish the game as a casual, fun experience.
I will diver deeper into the process of making this in the next blog!
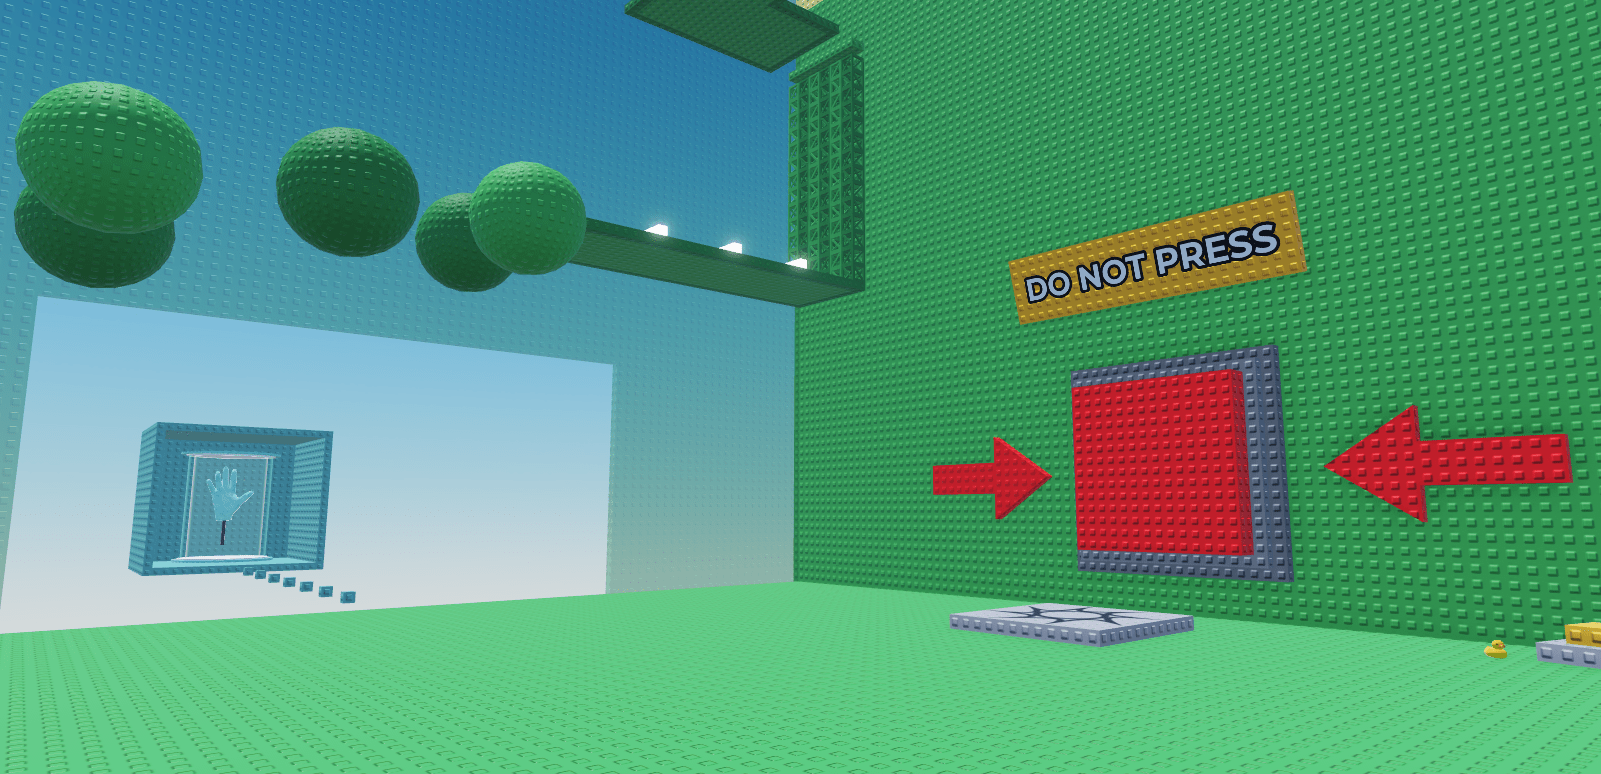
The Button
I made a simple button script, that would simply detect that a player had touched the brick.
local button = script.Parent
local hasBeenPressed = false

button.Touched:Connect(function(hit)
  -- Ignores push if on cooldown
	if hasBeenPressed then return end

  -- Checks if it was an actual player that pressed
	local character = hit.Parent
	if character and character:FindFirstChild("Humanoid") then

		hasBeenPressed = true
		-- Move button animation
		button.Position = button.Position - Vector3.new(0, 0, -1)


    -- Our module scripts will go here later on...


    -- Cooldown reset
		task.wait(15)
		button.Position = button.Position + Vector3.new(0, 0, -1)
		hasBeenPressed = false

	end
end)This button is what basically half of the game, so it’s important I get it right
I added a fun, goofy sign saying in bold: DO NOT PRESS and some red arrows next to it, just to add some life to the button

Disasters
My next step was to plan which disasters make the cut for the game. The list I’ve come up with so far includes:
- Tornado – this will pass through a random stage and throw players around the obby!
- Tsunami – anyone at the first level must start climbing the obby tower as fast as possible, or their fate is in the hands of the tides… (morbid, right?)
- Ice Freeze – this was mentioned earlier, makes everything slippery
- Low Gravity Event – self explanatory
- Anvil Rain – Starts raining anvils that would hit a player into the level below
This is a short list, as I aim to add at least 20 random disasters that players can discover, each having a different outcome every time.
Creating the Event System
In order to add and remove events from the button with ease, I came around with a simple ModuleScript system that would include a list of possible events…
-- Table of module names
local eventModuleNames = {
	"AnvilEvent",
	"HighSpeedEvent",
	"LowGravityEvent",
	"TsunamiEvent",
	"SlipperyEvent",
	"TornadoEvent"
}…and randomly choose one to call from the EventModules folder I created in ServerScriptStorage. (The following code is inside of the button press check)
-- Pick a random event module and execute it
		local randomIndex = math.random(1, #eventModuleNames)
		local chosenModuleName = eventModuleNames[randomIndex]
local chosenModule = require(EventModules:FindFirstChild(chosenModuleName))This was fairly straightforward, but I also needed a bit of creativity on the other end too, needing to support this directly in the ModuleScripts themselves.
The Other Side
This is where I needed to get more technical, since I wanted all events to have some universal properties, specifically how long it lasts for
I needed to create a global variable that I can call from all event modules.
I did this by simply making an “EventSettings” ModuleScript in ReplicatedStorage that would store these variables, which I could call from the EventModules at any time (see below)
local Settings = {
	EventDuration = 12, -- I set the EventDuration to 12 seconds here!
}

return Settings
local Workspace = game.Workspace
-- Load the global event duration variable (say hi if you see this reader!)
local ReplicatedStorage = game:GetService("ReplicatedStorage")
local Settings = require(ReplicatedStorage:WaitForChild("EventSettings"))
local duration = Settings.EventDuration
return {
print("Event module working!")
}Testing The Button
I named our test module “TestModule” (crazy, right?), and added the name to the table of module names we created in the script under our button.
Lastly, all I had to do was hop in the game and press the button, and check the console.

And there you have it! Our system works.
If you would like to reach out with any suggestions or would like to contact us in regards to this project, please contact us here.
Go, go, go! Read the next part of our series!