The Beginner’s Guide to LocalScripts in Roblox
Understanding how and when to use LocalScripts the right way
Whether you’re new to scripting in Roblox or looking to level up your game development, LocalScripts are one of those tools that confuse a lot of beginners—but they don’t have to. In this guide, we’ll break down exactly what they are, why they’re important, where they work, and how to use them to improve your gameplay experiences.
What Is a LocalScript?
When you first start scripting in Roblox, you probably get introduced to the regular Script object. Add one to your game, type in something like:
print("Hello world")…and it shows up in the output when you hit “Play.” Simple stuff.
But then you notice something else in the menu: LocalScript.
At first glance, it looks exactly the same. It even runs the same print("Hello world") code. But when you hit “Play”? Nothing shows up in the output.
So what gives?
Understanding the Difference Between Scripts and LocalScripts
The difference lies in how Roblox handles the client and the server.
Scripts (also called server scripts) run on the server, which is the master version of the game.
LocalScripts run on the client—that is, each individual player’s device.
Think of it like a website. When you go to Roblox.com, you can inspect the page and change text on your screen, but you’re not editing the real site. That’s exactly how LocalScripts work—they affect only your copy of the game, not the server itself.
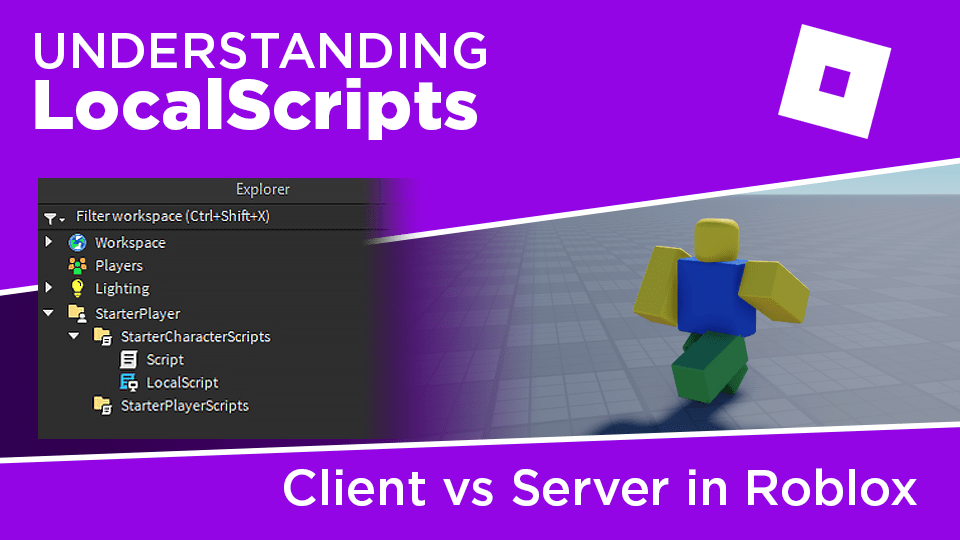
Where Can LocalScripts Run?
This is where many new scripters get tripped up: LocalScripts don’t work everywhere.
They only run if placed in certain locations tied to the player:
- StarterGui
- StarterPack
- StarterPlayerScripts
- StarterCharacterScripts
- ReplicatedFirst
Why? Because these folders get cloned into the player when the game runs. If you try to run a LocalScript somewhere else—like straight in Workspace—it won’t work.
Pro Tip: For your first test, place the LocalScript inside StarterPlayerScripts, hit Play, and you’ll finally see that “Hello world” appear.
What Can You Use LocalScripts For?
Since LocalScripts only affect the player’s view of the game, they’re perfect for things like:
- Custom GUI interactions
- Animations and camera effects
- Input handling (keyboard, mouse, touch)
- Client-side visual effects
- Individual gameplay variations
Let’s walk through a quick example.
Example: A Tunnel That Opens Just for You
Say you’ve created a black part called “Entrance” blocking a tunnel. Now, you want the part to disappear when the player presses a button—but only for that player.
Here’s the LocalScript:
workspace.Entrance.Transparency = 1
workspace.Entrance.CanCollide = false
When you put this inside StarterPlayerScripts and hit Play, the part vanishes and you can walk through it.
But if you switch to the Server view, the part is still there. Only your client sees the tunnel as open.
This is super useful if you want to show or hide things just for individual players—like secret paths, doors, or cutscenes.
GUI Example: Making a Button That Works Locally
Most GUIs in Roblox use LocalScripts. Why? Because UI is inherently player-specific.
Here’s a basic example:
- Add a ScreenGui and TextButton to StarterGui.
- Insert a LocalScript into the button.
- Use this code:
script.Parent.Activated:Connect(function()
    print("Clicked")
end)
Now when you click the button during play, you’ll see “Clicked” in the output. But only on your screen.
Want to take it a step further? Use that button to toggle the entrance:
script.Parent.Activated:Connect(function()
    workspace.Entrance.Transparency = 1
    workspace.Entrance.CanCollide = false
end)
Bonus: Multiplayer Test Example
Want to really test how LocalScripts behave in multiplayer?
- Use the Test tab in Studio to open two player windows.
- Click the GUI button on Player 1’s screen—the entrance will vanish for them.
- Look at Player 2’s screen—the entrance is still there.
This shows how LocalScripts only affect the individual client.
What If You Want Everyone to See the Change?
Here’s the big question:
How do you make something happen for everyone when a player clicks a button?
That’s where RemoteEvents come in. LocalScripts can’t change the server directly—but they can send messages to it.
Want to learn how to do that? Check out a guide on RemoteEvents next.
Final Thoughts
LocalScripts are a powerful tool in your Roblox development toolkit. Understanding when, where, and why to use them is crucial for creating dynamic, player-specific experiences.
TL;DR:
- LocalScripts only run on the client
- Place them in player-related folders
- Great for GUI, effects, and input
- Use RemoteEvents to communicate with the server
Now that you’ve got the basics, go experiment. And if you’re still stuck, explore some beginner-friendly RemoteEvent tutorials to level up even more.