Better Code Starts with Better Variables — Here’s How
Starting your Roblox scripting journey? One of the first building blocks you need to master is variables. In this beginner-friendly tutorial, we’ll walk you through exactly what variables are, how to create them in Roblox Studio using Lua, and why they’re essential for making cleaner, more efficient code.
By the end of this guide, you’ll not only understand what variables do — you’ll actually use them to make your scripts more flexible and powerful.
Let’s dive in.
What Is a Variable in Roblox Scripting?
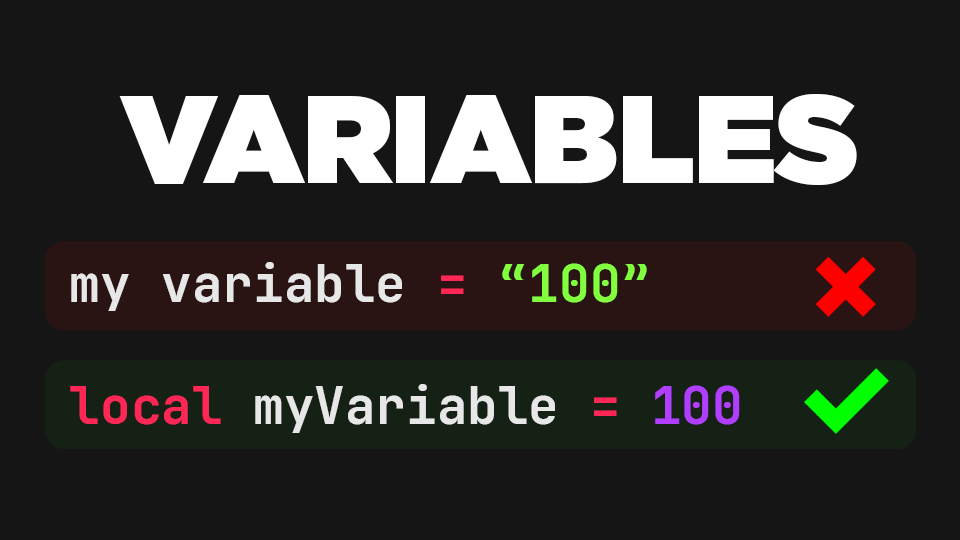
A variable is just a name that refers to a value. Think of it like a label on a box: the label tells you what’s inside, and you can use that label whenever you want to access what’s in the box.
For example, instead of typing the number 100 over and over again, we can store it in a variable called myVariable and just use that name in our code.
Here’s a simple way to define a variable in Lua:
local myVariable = 100This line means: we’re creating a variable called myVariable and assigning it the value of 100.
Let’s See It in Action
If you want to test this yourself, open Roblox Studio and follow these steps:
- Open your game in Roblox Studio.
- Create a new Script inside the
Workspace. - Rename the script to something like
Variables.
Inside the script, try typing the following:
Now run the game using Play (F5). Check the Output window — you’ll see the number 100 printed. That’s because myVariable is now acting as a reference to the value 100.
Why Use Variables Instead of Repeating Values?
Let’s say you want to print the number 5 three times. You could do this:
print(5)
print(5)
print(5)
But what if you later decide to change all of those 5s to 10s? You’d have to update every line manually.
With variables, that process becomes way easier. You can write:
local myNumber = 5
print(myNumber)
print(myNumber)
print(myNumber)
And now if you want to change all of them to 10, just update the variable:
local myNumber = 10That one change will update every place in your script where myNumber is used. It saves time and keeps your code clean.
Naming Your Variables Properly
To make your code easier to read, it’s important to follow a naming convention. A common method is called camelCase. This means:
- Start with a lowercase letter.
- Capitalize the first letter of each new word.
For example:
local playerScore = 50You can also name your variables more descriptively:
local myVariableIs50 = 50But be careful — if you change the name of a variable, make sure you also update every place it’s used in your script. Roblox Studio will even help auto-complete the name for you once it’s defined.
Practice Time: Create Your Own Variables
Now that you understand the basics, try this small challenge.
- Create three variables in your script.
- Assign each one a different data type:
- A number (like
50) - A boolean (like
true) - A string (like
"Hello Roblox!")
- A number (like
- Use
print()to display each one in the Output.
Example:
local score = 50
local isGameOver = false
local welcomeMessage = "Hello Roblox!"

print(score)
print(isGameOver)
print(welcomeMessage)
Run your game and check the Output. You should see all three values printed.
Final Thoughts
Variables are one of the most important tools you’ll use in scripting. They keep your code flexible, easy to maintain, and readable. Whether you’re printing numbers or storing player data, variables help you organize your logic and avoid repeating yourself.
So before moving on to more advanced topics, take some time to experiment. Create your own variables, assign them values, and print them out.
Once you’ve got the hang of it, you’ll be ready for more powerful scripting concepts.
Happy coding!