How to Create and Sell a Roblox Shirt (Even If You’re a Total Beginner)
Ever wanted to make your own Roblox shirt but didn’t know where to start? Whether you’re looking to flex your creative muscles, earn some Robux, or just want your avatar to look sharp, this guide will walk you through the entire process — from downloading the template to uploading and selling your shirt on Roblox.
Let’s get into it.
Step 1: Get the Official Roblox Shirt Template
Before you get creative, you need the blueprint. Here’s how:
- Go to the Roblox homepage and click the Create tab.
- Under Creations, select Avatar Items > Classic Clothing > Classic Shirts.
- Click Upload Asset, then Learn More.
- Scroll down to find the Shirt and Pants Template section.
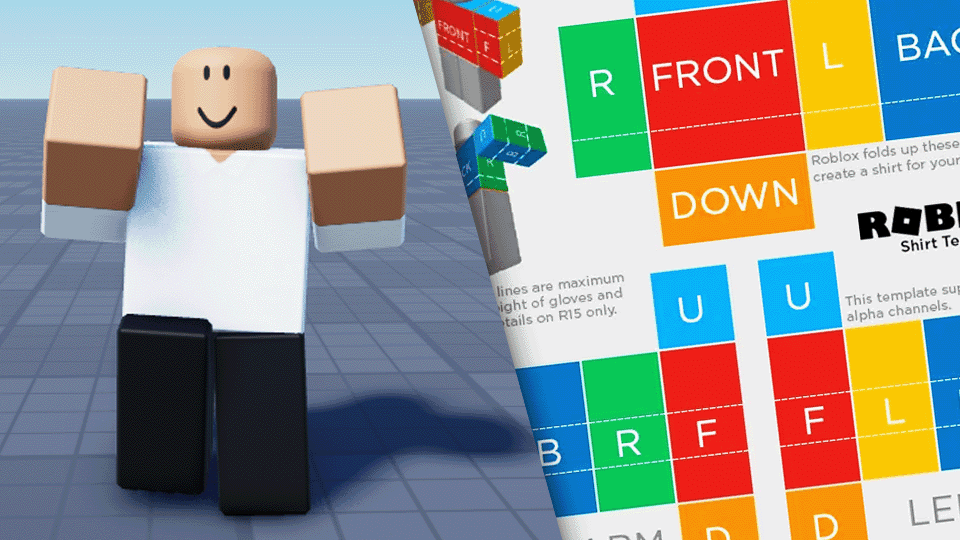
- Click the link for Shirt (Torso and Arms). This will download a
.zipfile.
Once downloaded, right-click the file, choose Extract All, and you’ll see a folder containing both the pants and shirt templates. We’ll use the shirt one.
Step 2: Open the Template in Pixlr Editor
Now we need to edit the template to design your shirt.
- Go to pixlr.com.
- Click Pixlr E (Advanced Photo Editor) on the bottom left.
- Hit Open Image and upload the shirt template you just saved.
Important: Make sure your image is sized 585 x 559 pixels. If it’s not, Roblox won’t accept it!
Step 3: Make the Template Transparent
To design your shirt, we need to make the default template transparent.
- Select the Select Tool from the toolbar.
- One by one, select each of the rectangular sections (called “faces”) on the template and hit Delete or Backspace.
- You should be left with just the outline.
Step 4: Add a Shirt Color
- Create a new empty layer and drag it below the original background.
- Choose your color using the Fill Tool — go pink, black, neon green, whatever speaks to your soul.
- Use the Arrange Tool to drag the color layer over the appropriate sections to create sleeves or a torso area.
Step 5: Add a Neck Hole (Optional but Cool)
- Select the Ellipse Select Tool (change from rectangle).
- On the top torso section, create a circle for the neck hole.
- Press Delete on the colored layer to cut out the neck space.
Step 6: Add Detail (Outlines & Sleeves)
You can make your shirt look sharper with a bit of outlining.
- Create a new layer for details.
- Use the Shape Tool and set Fill = Off, choose Circle and outline the neck hole with a lighter or darker version of your shirt color.
- Use the Line Tool to draw short sleeve outlines by dragging lines across the arm sections.
This adds depth and polish.
Step 7: Add Shading for That Pro Look
Don’t worry if you’re not a shading expert — we’ve got a shortcut:
- Google Roblox shirt shading template and filter results by Color > Transparent.
- Pick one you like, copy it, and paste it directly into Pixlr. It’ll automatically show up as a new layer.
- Use the Select Tool to remove any extra shading that overlaps with sleeves or the neck hole.
Make sure this shading layer is above your shirt design layer.
Step 8: Add a Logo or Design (Optional)
Got a logo or graphic? Here’s how to add it:
- Upload the image into Pixlr.
- If the logo has a background, use the Wand Select Tool and set tolerance to ~50.
- Click the background and press Delete.
- Resize and position the logo wherever you want — chest, sleeve, back — it’s your shirt.
Pro tip: Place your logo under the shading layer to make it look more natural.
Step 9: Save Your Shirt Design
You’re almost there!
- Go to File > Save.
- Make sure the format is PNG and Transparent is enabled.
- Name your shirt and click Save As.
Free Pixlr accounts allow up to 3 saves per day, so plan accordingly.
Step 10: Upload and Sell It on Roblox
Back on Roblox:
- Go to Create > Avatar Items > Shirts.
- Click Upload Asset, choose your shirt file, and give it a name.
- Set Asset Type to Shirt (don’t confuse it with T-shirt — that’s image-only).
- Pay the 10 Robux fee to upload.
- Once it’s uploaded, head back to the Create tab to set a price and enable sales.
Boom — your shirt is live!
Test It In-Game!

Once you equip your new design, check it out in-game on your avatar. Whether you use the R6 or R15 model, your creation will stand out in style.
Final Thoughts
You did it! You made and uploaded your very own Roblox shirt.
Even if this was your first time designing anything, you’ve now got the tools and skills to go even further — create full outfits, start a clothing brand, or just flex some digital drip on your friends.
If you found this guide helpful, feel free to share it, drop a like, or subscribe to the creator who inspired this tutorial (they’re more about entertainment than tutorials — but they nailed this one!).
Got questions? Leave them in the comments and help others on their Roblox fashion journey!